So. What we have here is one mega-butt-kicking after-action report for a game of ATS Berlin: Red Victory. The game took a while to finish – the first three turn were played the first week of August, the last three turns were played the first week of September. But there you have it.
The scenario here is Moabit Mayhem, from Berlin: Red Victory. It uses a medium-sized slice of the game’s massive Berlin map to portray the initial Soviet assault into the Moabit district.
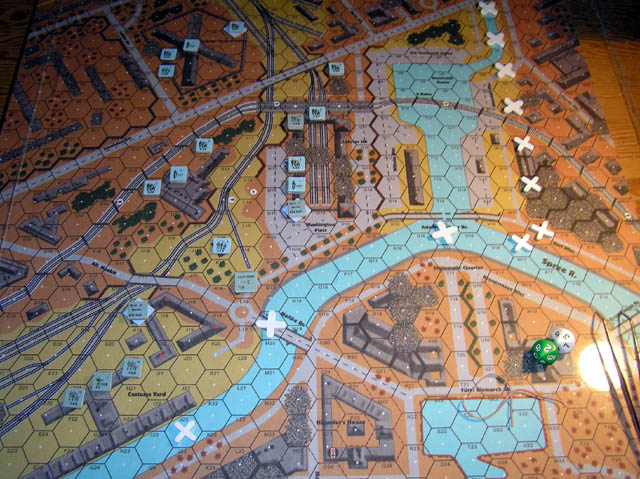
In order to win the game, the Soviets have to capture three of the four objective building complexes on the map – the Prison, the Train Station, the Customs Yard and a location just west of the Train Station that I’ll refer to as the Office Building.
The German setup was intended to lightly defend two of the locations – the Prison and the Office Building – and focus the main effort on defense of the Customs Yard and the Train Station. In addition to their on-map troops the Germans will receive 5 squads of heavily-armed parachute infantry on Turn 3. They also benefit from an SSR that subjects Soviet units moving near the river to possible sniper fire.
Turn 1
On Turn 1, my Soviets swarm onto the map, mostly with balls-to-the-walls movement (as evidenced by all of the ‘Winded’ markers in the turn 1 photo). As is the case in many scenarios, the attackers don’t have much time to sneak around in this one – so some early rapid movement to get stuck-in quickly is the prime directive.
My Russians attacking the Customs Yard spent the first turn just getting into position for more serious work. I rolled a couple of assault guns up to try and blast the defenders, and one of the heavy howitzers unlimbered where it can engage the German medium machinegun. If the Reds don’t get the initiative on turn 2, the gun crew may well get shot to hell by the MG – but at least they’ll provide a distraction so the rest of the attackers can get to work.
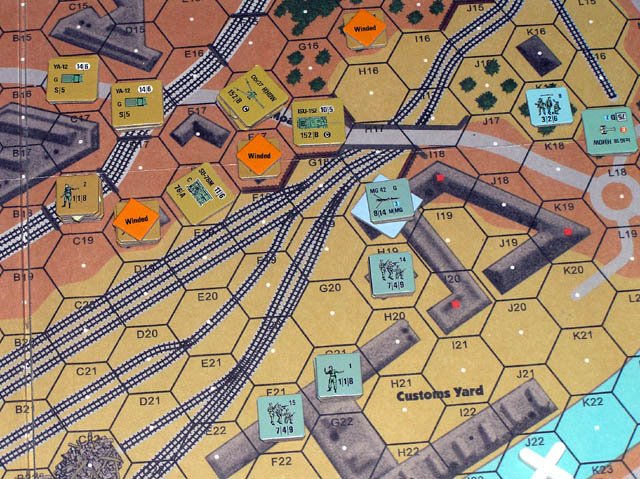
The Soviet troops tasked with taking the Office Building got stuck in to their assault rapidly. In the turn 1 photo, one of the ‘Winded’ stacks has already engaged in melee and eliminated the occupants of the Office Building.

My Russians’ turn 1 was aided by truly, honestly miserable shooting from the Germans (maybe because they’re Volkssturm?). Even with all of the running movement, the Russians took a grand total of 2 steps of casualties. In maybe 10 or so attack dice rolls (with a d10), my opponent rolled less than a ‘7’ exactly twice. Russian rolls were less numerous and no more successful, but since my main job on turn 1 was movement that was no big deal.
Turn 2.
The Germans won the initiative for turn 2, and the machinegun in the Customs Yard mowed down the crew of the howitzer before it had a chance to fire. But the SU-152 blasted the crap out of the machine-gunners and turned the upper floor into smoldering rubble.
Russian infantry, meanwhile, cleaned up the lurking Volkssturm tank-killer squad and also took out the crew of the infantry gun. My Soviet grunts took some casualties assaulting the tank-killers, but they did their job.

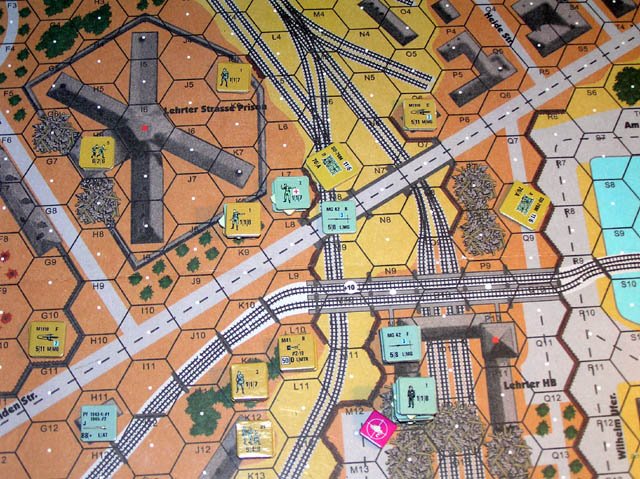
There’s another German machinegun upstairs in the Train Station that can fire to cover the flank of the Customs Yard. One of my goals for turn 3 is to neutralize that gun. The two 203mm howitzers can both draw a bead on it, as can the SU-152. If the Germans win turn 3 initiative, I think maybe the machinegun guys should run and hide somewhere.
In the center, I consolidated my hold on the Office Building and began firefighting with the Germans in the Train Station. I didn't want to put too much of my infantry in harm's way because the Germans will get their reinforcement platoons on turn 3 and I wanted to see where those guys go first.
In the north, the Germans simply tried to draw things out. The Volkssturm guys up there managed to infiltrate away from the my assault squads and avoid melee – but they had to retreat into an exposed cellblock location of the prison in order to do it. They will likely get shot to bits in turn 3. They’re going to lose the prison, of course, but it’s more a question of how long they can hold out and how many of my squads they draw into the fight and away from other locations.
Turn 3
Sometimes it’s a bad day to be in Berlin, as the 3_End photo probably demonstrates. What my honorable German opponent thought would be a steely defense of the Customs Yard pretty much crumbled in the space of a single turn.
His German paras holding the Yard had largely been hunkered down, holding off to cover the approaches to the complex with opportunity fire. I suspected that the Germans doing anything down there but holding their fire in anticipation of a Soviet assault would be a mistake. And I was right.
It was one of those ‘slippery slope’ chain-reaction things. All of my Russian tank fire on the Yard defenders was pretty ineffective, although I did manage to get BOT on a couple of positions that would improve my chances on turn 4. I was thinking about being patient for a couple of turns to let the big guns do their thing, but then I realized I had a Red assault platoon (three squads and a leader) in the orchard south of the Office Building that could actually move under the bridge and into the building below the rubble of the former machinegun nest without taking any opportunity fire until they were under cover of the masonry building.
So that’s what I did. Of course, the German para squad they moved adjacent to fired at them – but a single squad (even of paras) doesn’t really have enough firepower to score much of a result against steely Slavic grunts under masonry cover (even with the shift reduced by assault movement). My guys took only a single step loss and were then in a position for a melee assault.
Plus, that expended about a third of the available opportunity fire that was covering the front of the Yard. A para squad has a good chance of shooting up attackers approaching across open ground – but coming at them through the buildings on their flank was bad news for them.

I pushed up a medium machinegun on the far left of the map, and that’s when the Germans experienced a ‘command failure’. One of the other German para squads shot at it. They inflicted a C1 result and the crew then flunked their morale check and broke – but that expended another potential defensive fire. That left one German squad able to cover the front, but I had two assault groups in position. So I sent them in. The first group of two rifle squads and a leader got shot up pretty good on the way in when the Germans rolled up a jolly C4 result. That flipped both squads. The leader and one squad broke, but the Germans were then out of opportunity fire. Three Russian submachinegun squads (those lovely 8-2-8 guys) then charged in with a leader. They didn’t even have to get into a melee; their assault fire wiped out the German squad they were going to attack. In the 3_End photo you see the results of the German debacle: A second squad wiped out in melee and the surviving para squad withdrawing to a spot where the Russian tank guns can’t shoot at it. Bad day to be a German paratrooper indeed.
Endgame – turns 4, 5 and 6
After about a two week layoff, we finally got in a session to wrap up the scenario.
The accompanying digisnaps show the main positions after turns 4, 5 and 6. The Germans didn’t have enough of a toe-hold anywhere to give any help to their five counter-attacking squads of parachute troops. So the paras had to make their way into the Train Station and then figure out what to do. In order to prevent a Russian win, they have to contest occupation of at least two of the four major building complexes in the play area – the Customs Yard, the Prison, the Office Building and the Train Station.
The snappies tell the story in a nutshell. On turn 4, the paras moved into the Train Station as the remnants of a defending Volkssturm platoon fled from the approaching Russians. The lone squad of Reds in the Train Station had just used infiltration to engage and eliminate two broken VS squads.

On turn 5, the German paras managed to eliminate the over-enthusiastic Russian squad and then moved into a jumping off position for their final, bold attempt to contest a second building. Chances for a successful counter-attack were pretty slim – because with most of the rest of the German force eliminated the paras would have to leave enough behind to hold the Train Station.
As you can see in the End_5 snappie, my Russians pretty much had the Train Station ringed with infantry, assault guns and heavy weapons. Pretty desperate looking, although my flank near the prison appeared weak enough that we thought it might be fun to give it a try.

The End_6 snappie shows where we called it. The para platoon remaining in the Train Station delivered some punishment to the Reds in the Office Building, but got whacked by a blast from one of my SU-152s (thus the BOT marker on them). The second para platoon used smoke to cover the first part of their movement out of the Station, and moved to attempt a point-blank PanzerFaust shot on the SU-76. Their shot just missed, and they got blasted for their trouble.
So. With the most of the paras remaining in the Train Station sitting under a BOT from a 152 mm assault gun and the second para platoon fairly shredded and still outside of the prison, we decided to put the wraps on this one.

