Tuesday, June 27, 2006

Strange Defeat: Catastrophe strikes!

Yes, indeed. Monday – sometime Monday – a literal cat-tastrophe struck the invasion of France.

Normally, Sam the Cat doesn't venture into my office where the big game table is set up. During the day, when I'm not home, the office door is closed - both to keep Sam out and, lately, to keep my 15-month-old Juan Carlos from diving under my desk and switching off all of the little glowing buttons.

At some point today, though, Juanco opened the door and ran cackling for my desk. Grandma intercepted him - but apparently left the door open long enough for Sam to find his way in and curl up in a corner to sleep for a while unmolested by Juanco the Giggling Cat-Chaser. When Grandma later closed the door, Sam found himself trapped.


When I got home and opened the office to put away my brief case, Sam was sitting - quite defiant and rather pissed off - in the middle of France with half of the Allied Army knocked into the English channel and half of the German army swept onto an adjacent map for ATS: Berlin. So ended the campaign for France.

A do-over will shortly be underway – although I suppose it won’t get quite the same detail of blow-by-blow narrative. I will, however, update with more observations and general impressions.

Strange Defeat: The invasion presses forward

Turn two opened with the fall of Defiant Holland as the Germans overwhelmed the defenders of Amsterdam – with German motorized forces roaming the rest of the country at will the Netherlands would surrender at the start of Allied turn 2.

Farther south, German forces expanded their crossing of the Dyle and fought their way through additional Belgian fortifications. Strong counter-attacks by the BEF inflicted some casualties, but by the end of the turn only a lone step of Belgian forces remained on the map.


Panzer forces rolling out of the Ardennes continued driving toward Paris, overrunning Chalons in the process. Additionally, the fall of the northern-most Maginot fortifications would allow the Germans to push forward more of their infantry to support the spearheads.


Turn three went pretty badly for the Allies. The Germans used their greater mobility to re-direct their strongest panzer forces against the weak Allied ‘center’ – wiping out three French corps in the process. A clever little operation along the coast near Antwerp nailed a fourth French corps and the BEF reserve corps, and threatened to turn the northern anchor of the Allied line. They also launched a couple of attacks against the thinned Maginot defenses, causing the Allies to think perhaps they had combed out too many of the line’s better formations.

A French counter-attack mounted with three corps near Chalons met with some limited success, trading an infantry step loss for the reduction of the Germans’ strongest unit, the 19th Panzer Corps. Most of the German panzer units on the map are now operating at reduced strength – but the Allies have been so pummelled at this point that it may not matter.


In addition to the counter-attack, the French began trying to form up a defense of the capital in an attempt to stave off the Germans for a turn or two and gain some political points. In the north, the BEF operated in retrograde somewhat pell-mell to form a new line anchored on Ostend along with several French units. Their objective at this point is to divert Germans from the main thrust and to try to maintain a position that will allow for a rapid evacuation via Operation Dyanamo when the time comes.

Friday, June 23, 2006

Strange Defeat: The invasion begins

The German attack opened on turn 1 with a strong armored thrust out of the Ardennes, a large German drive into Belgium and a smaller operation launched into the Netherlands.

The Dutch gave the invaders a bit of a bloody nose. German paratroops dropped on the lone Dutch fortress unit in Amsterdam, but their attack in conjunction with three additional units was a complete shambles that resulted in the elimination of the paras and no losses inflicted on the Dutch.

But that was pretty much it for the Allied highlight reel. The second parachute regiment dropped as part of the assault against the fortress of Liege and was considerably more successful. The Belgians took very heavy losses getting driven back from the Dyle, although by the end of the German turn they still held both Eban Emael and Namur. Only 5 SP of Belgian troops remained on the map, however. The German advance into Belgium cost them losses amounting to two steps of infantry and one step of motorized infantry.

The German panzer spearheads exploded from the Ardennes and hammered the French defenders. The assault on the northern-most of the Maginot forts met painful repulse, but the panzer forces skirted that battle and quickly drove back or elimnated the French defenders of Sedan and Mezieres. By the end of the turn four French units had been destroyed and a large gap blown in their defenses. German losses were very light, totalling just one step from the 5th Panzer Division. The first photo here shows the situation at the end of the German turn.


The Allies, faced with some severe movement restrictions on Turn 1, did what they could to slow the Germans and inflict some casualties. British and French forces moved forward to counter-attack in Belgium, and they also made use of some strategic movement opportunities to mount an operation against Guderian's spearhead at Mezieres. They also managed to score a minor success with the evacuation die roll for Queen Wilhelminia, gaining them one very happy Political Point.

The Dutch were forced to attack the superior German forces outside of Amsterdam (combat is mandatory unless the phasing units are in a fortress hex), but the Germans muffed their 9 defensive dice and neither side inflicted a casualty.

The first attempt at a joint British/French attack, against the German forward-most troops just north of Eban Emael, fizzled amid bickering and British fumbling. Alexander, the Royal Armored Corps and British 1 Corps evidently had bad maps, which left General Piroux and his DLM alone in a valiant assault that managed to inflict a step loss on 16 Panzer Corps. It was, however, a death ride for the French armor, as the DLM was destroyed and Piroux killed in the process.

French and British commanders farther to the south proved more cooperative. One of the French corps in the "MR" deployment group passed its movement check and moved against the Germans at Mezieres, providing some operational cover as British 3 Corps used strategic movement to join the assault. The coordination roll succeeded, and 3 French and the British corps slammed into Guderian's troops. Both sides suffered two hits, and both elected to take their second step loss as a retreat. The Allies lost one French infantry step in the attack, while the Germans lost a step from 10th Panzer Division.

The turn ended with the Allies able to form some sort of a line in front of the Germans, although the situation in the south is tenuous at best. The political point index stands at -7. The second photo shows the situation at the end of the first turn.

A new game on the table

Today I turn the gaming eye of this blog onto the subject of one of the latest games published by Avalanche Press, Strange Defeat: The Fall of France 1940.

Times being what they are (lacking time, that is), it’s only take me a week or so since it landed on my doorstep to get this one all ready to go. Which probably leads the casual observer (people without 15-month-olds running around the house switching all of the electronics off and on) to believe I’m some kind of a moron.

Physically, it’s not a large game. It’s packaged in one of APL’s small format boxes and retails for $20. 140 counters, small format rule book. The map, however, is more or less full-sized – and I’m going to address the subject of the map first because it’s my only real gripe with the game.

I say “more or less” full-sized because maybe a quarter of the map sheet is essentially waste area on the left-hand side. There’s a big honking title for the game – just in case you forget what you’re playing – and all of the game tracks are very small indeed. The terrain effects chart is not printed on the map. Perhaps it was supposed to be. In fact, the TEC is only available as a download from the APL web site.

The appreciation of map art, of course, is very subjective. Some folks like the Strange Defeat map, others don’t mind it. It’s not what I’d call a ‘bad’ map by any stretch. But it somewhat “underwhelming”, for lack of a better term.

It uses some of the same iconography found in the early games of the series – Defiant Russia and Red Vengeance. Small ‘sky scraper’ icons for major cities and a trio of ‘teepees’ for minor cities. Functional, but not much to crow about. Typography on the map looks rather small to me. There are no river names. The overall Michael Graves-ish blue and sepia pastel color scheme matches well with the box art, but gives the whole thing a bit too much distance and lacks impact.

From a function standpoint, my biggest gripe is with the very light cross-hatching used on the map to represent rough terrain, including the Ardennes. It is very light indeed and quite difficult for older eyes to discern – blue cross-hatching on a slightly lighter blue background. I also question how much of the huge expanse of map that lies west of Paris will come into play, although in fairness I have not yet played a complete and don’t have a feel for the campaign possibilities.

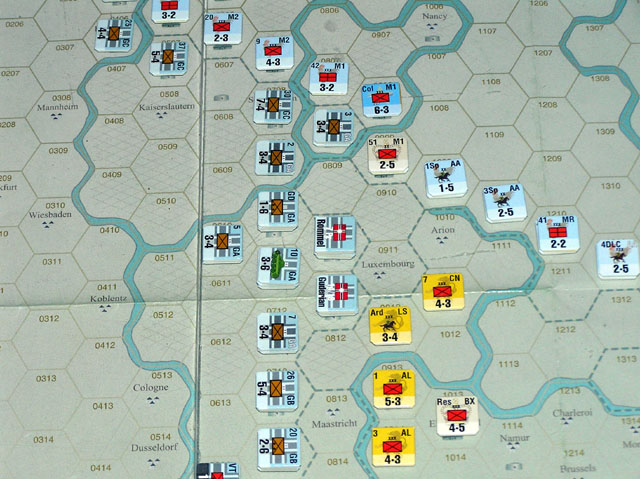
Counter artwork is up to the usual APL good standard, although they are nothing spectacular. This is due, in part, to the map color scheme. Blue-gray German units and French blue.. well, French … units lose their impact to a degree because of the blue map theme. Otherwise, they are quite readable and well done.

The hex-grid numbering, according to APL, was ‘flipped in production’. As a result, they have provided a new setup card as a download on their website. The setup listed in the rulebook, as a result of the ‘flip’, is completely useless. Oh, and one quick mention of the overall map orientation: The map’s ‘top’ is south in this game. North is at the bottom.

Setup takes a bit longer than you would think for such a small game. It probably gets quicker with experience. Units are each tagged with a setup code, and each setup code has an allowable range of hexes for deployment as listed on the setup card.

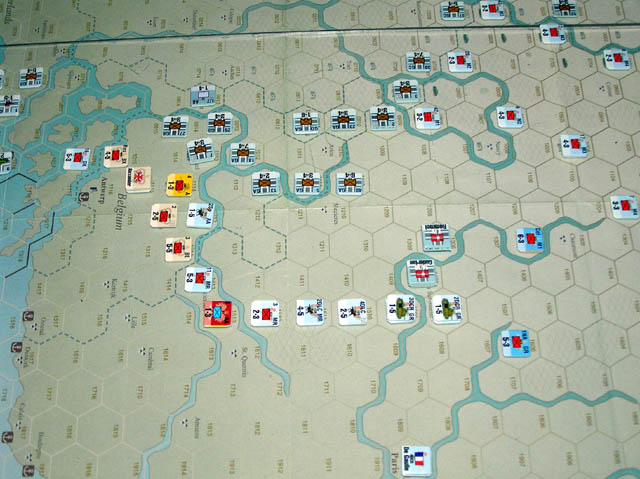
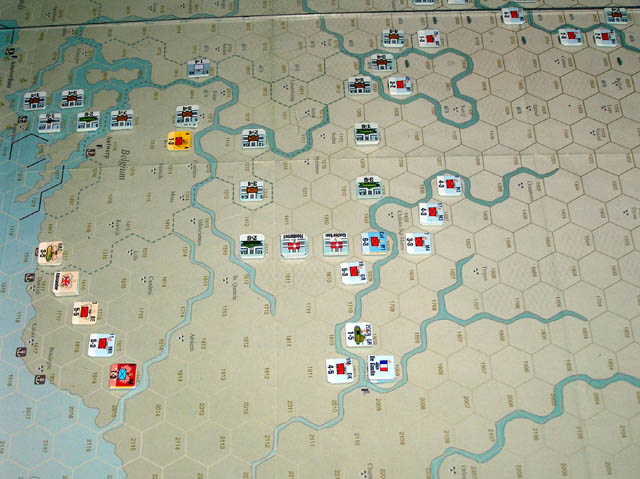
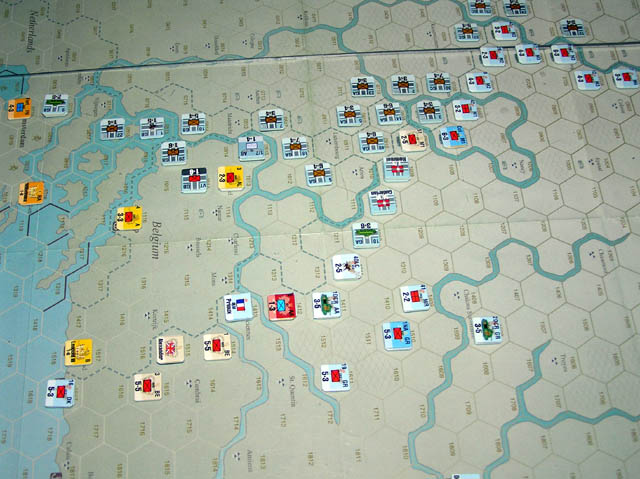
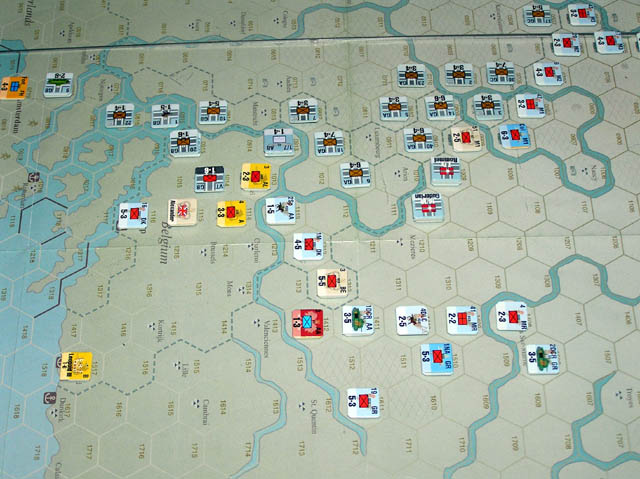
Here’s a digisnap of the deployments around the Ardennes used for my first game.


The Germans have basically three setup groups: One covering the Westwall defenses, one comprising the forces attacking out of the Ardennes and a third comprising the attackers from the Ardennes north.

Allied setup groups are more complicated. There are four smaller groups covering the Maginot Line. Another group screens France from the Maginot to the Belgian border. Netherlands and Belgian forces have their own deployment zones. The British, save for one unit, all deploy in or adjacent to Liege. And the French have a further general reserve that deploys within 4 hexes of Paris. A couple of other small deployment groups finish things out.

Next time: The first turn.