Thursday, February 16, 2006

PanzerGrenadier: Wrapping up Fontana Alba

To put a wrap of sorts on my running game of PanzerGrenadier: East Front Deluxe, I’ll sum things up by pointing out that it’s VERY hard to completely wipe out one side in a scenario.

EFD scenario three, Fontana Alba, is difficult for either side to win. The Romanians have to control the town. The Soviets have to kick all Romanians back across the river. I think balance in this scenario tends toward a draw, with a modest chance of a Soviet win that depends to an extent upon how hard the Romanians press their initial attack.

The Reds begin rolling for their counter-attack beginning with turn 13 – they have to roll a ‘6’ on a single die to receive their reinforcements. Each hour (four turns), the score needed to trigger the reinforcments increases by one. In this game, they roll a ‘5’ on turn 19 and the counterattack sweeps onto the board.

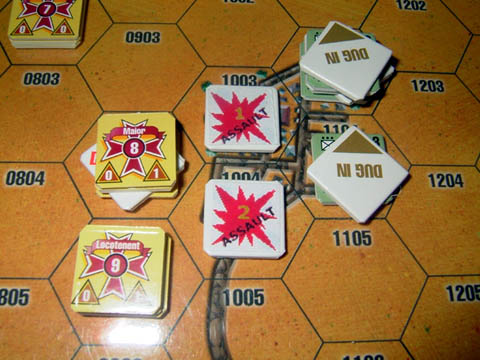
As seen in the photo below, by the time the counter-attack goes in, the Romanians have managed to contest three of the four hexes of Fontana Alba with assaulting units. The Soviet task at this point largely consists of trying to winkle the Romanians out of those assault hexes.


Sweeping away the few Romanian units that remain outside of the town isn’t a terribly difficult task. The stack of two Romanian machinegun platoons close to the river bridge gets pounded to dust by the Soviet off-board artillery (3 x 10-point concentrations) and the three Soviet on-map mortar platoons, before falling victim to a company-sized assault in fairly short order.

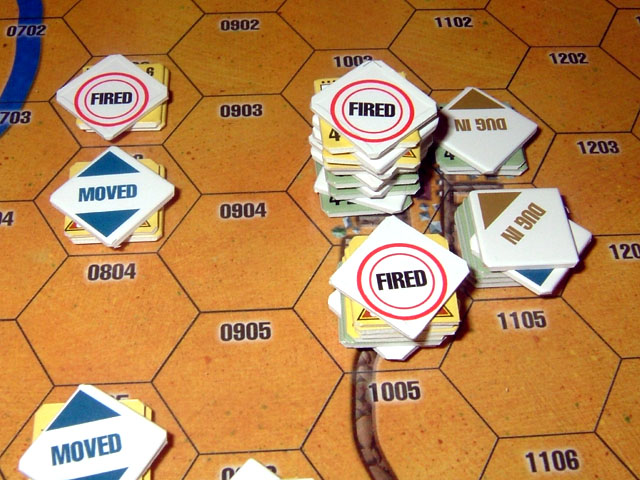
The remainder of the game then boils down to the Soviets managing their assaults against the three town hexes while the Romanians can do little more than hunker down and try to hang on by their fingernails.

The northern-most town hex is cleared in a couple of turns, as the two reduced cavalry platoons there lack any stamina at all in the face of a company-sized assault. Romanians in the other two town hexes cling grimly to their positions, but without reinforcements and with no place else to hide, they can only do so much.

It’s a close-run thing, but the Soviets finally manage to clear out the last of the Romanians with one turn remaining in the game. Had the Romanians suffered slightly lighter casualties in their initial attacks on the town – say, two fewer step losses – they likely would have had sufficient strength to hang on in at least one of the assault hexes and force a draw. As it played out, however, the large Soviet counter-attack – aided considerably by good Soviet leadership draws – was simply too much for the Romanians to contend with.

Wednesday, February 15, 2006

When a balloon is the center of the universe

Our child, of course, has no toys. None. He has to play with empty boxes, plastic clothes hangers and spare tubes of Dr. Boudreaux’s Butt Balm to find any happiness at all. (Well, that’s HIS version of events, apparently).

It should comes as no surprise, then, that the helium-filled mylar balloon his Grammy and Pappy gave him for Valentine’s Day was the single greatest event of his young life. He grabbed it, poked it, whacked it, chewed it, drooled on it and generally had a big, whooping time with it. He even slept with it.

If a picture is worth a thousand words, then here you go:


Tuesday, February 07, 2006

PanzerGrenadier: Density reduction

After my “stack ‘em high” post earlier, I wrestled a while with the topic of big stacks in assault hexes. In something less than a fit of brilliance, it suddenly occurred to me that I needed to be using markers for assault hexes and off-map boxes (or cards) to hold the units involved.

Good heavens. I’ve only been playing PanzerGrenadier since the first edition was published years ago. Only now, after years, does the idea pop into my little pea brain. Funny how that works. Perhaps it’s because as I get older I get more fumbly-fingered, so methods of clutter reduction (especially with those hefty 5/8-inch counters) become more important.

Anyway, here are some photos of the results. Numbered markers for the assault hexes. The units that are in those hexes go onto cards with matching assault stickers.

Doh!


Monday, February 06, 2006

PanzerGrenadier: Those deadly assaults

As I’ve noted before, assault is where a lot of the casualties happen in PanzerGrenadier. Our game of Fontana Alba is no exception. In two playings, the Romanian assault on the town turned out to be the focus of the action (kind of ‘duh’, but there it is).

In the first play-through, the Romanians were somewhat impatient and rushed in for assault without much softening up of the Soviet defense. The result was an outright catastrophe for the attackers. Cavalry gives up a +1 shift to direct fire for starters, which helped get them chopped to ribbons. Charging into a solid defense, they lost four steps to opportunity fire before they were able to engage the first assault.

Since that was such a mess (and kind of stupid, too), that game was written off as an example of how not to execute an assault.

In the second playing, they approached with considerably more patience and beat on the defense with artillery and support weapons (mostly the two machinegun platoons) before closing to assault. As noted in my previous post, this time they were able to get ‘stuck in’ without suffering too much from opportunity fire. For a couple of turns they made a brave run at clearing out the Soviet defenders. But…

Results can snowball pretty quickly in assault. One or two bad morale rolls, or one or two good enemy morale rolls, can cause the situation in an assault hex to get out of control in short order.

The Romanians and Soviets traded assault results for several turns. Superior Romanian morale and more numerous leadership helped them overcome the defensive bonus of the town and they forced a number of morale checks. One unfortunate Soviet rifle platoon consistently flunked its morale checks and ended up eliminated after multiple failures resulted in two step losses. But the Red machinegun platoons in particular proved impossible to shake (both passed a couple of ‘M2’ checks).

In the 0830 and 0845 turns, the Soviets suffered a total of 3 step losses in assault and inflicted two on the Romanians (giving each side 3 step losses total). The Soviets fed some reinforcements into the assault hexes, though, and kept fighting while the Romanians maneuvered to bring support fires to bear on the two hexes of the town that weren’t under assault.

The wheels started to come off the Romanian effort, though, in the 0900 turn. The Romanians in 1004 totally whiffed on their assault result, while the Soviet defenders scored a ‘1’ against them in return. Both sides scored ‘M2’ results in assault in 1003 – and the Romanians consistently flubbed their morale checks while the Soviets passed more than their share of the critical morale rolls.

The additional step loss dropped Romanian initiative to ‘1’ in the 0915 turn and they lost the initiative roll. The Soviet captain defending the town then personally led a counter-attack into 1003, which contained (at the start of the turn) a disrupted Romanian leader, a disrupted Romanian cavalry platoon, and two demoralized full-strength cavalry platoons.

The Soviets scored a ‘1’ result and the Romanians elected to reduce one of the demoralized platoons. The Romanian leader passed his MC, but all three combat units failed. This resulted in two additional step losses from the two demoralized units (who both failed their MC by three or more) and the demoralization of the third platoon as well.

Figuring in the results from the assault in 1004, by the end of the 0915 turn the Romanians had lost 7 steps against the Russians’ 4. They had no good-order units remaining in 1003 – which was held only by a disrupted leader and one disrupted platoon after all of the recovery rolls. The area around the town was littered with reduced and demoralized Romanian cavalry units. The attack on the town, for the most part, appears to have broken.

That’s where we’ll leave the narrative for the day. The next turn, 0930, will mark the half-way point of the game (turn 15 of 30). It looks like from here on out, the Romanians will be playing for a draw – as clearing the town now seems incredibly unlikely.

However, their support weapons are all intact, as is their chain of command. And they’ve still got that off-board artillery to spread around. So there’s a chance that the Romanians may be able to pull back, dig in and hold on to a chunk of the eastern map and salvage a draw from the game.

Thursday, February 02, 2006

PanzerGrenadier: Stack 'em high

PG scenarios that don’t include lots of AFVs and transport – and even some of them that do – have some signature characteristics that players need to understand in order to be successful.

In an earlier post, I discussed the game’s pace and its morale-centric combat system. The next thing players need to consider is the game’s use of space.

Frequently, a scenario will give you a deceptively large amount of space to play around in. It’s deceptive in that once you give the victory conditions a good going-over, you’ll often figure out that most of the action is going to be concentrated in a fairly small portion of the map. All of that space may give you a number of initial options for deployment and maneuver, but once the shooting starts the area of the game map that’s really important can narrow down very quickly.

My example scenario – EFD Three: Fontana Alba – is a case in point. Two maps is a huge amount of territory for the number of units involved. But the victory conditions make it pretty clear that the four town hexes are going to be the focus of the game.

(Granted, if the Romanian player wants to play for a draw from the outset he might decide instead to occupy the woods to the south of town, but our Romanians here are playing to win and thus have to capture and hold the town. What kind of weenie starts the game looking for a draw?)

The Romanians have a few maneuver options – they have to decide on a direction to approach the town – but their goal is pretty straightforward. They have to move on the town, soften up the Soviet defense, and then assault to clear out the defenders. They have some time to accomplish this, but not tons of time. The scenario is 30 turns in length, but from the 13th turn (0900) out there is an increasing chance that a Soviet counter-attack will arrive.

In the example game, the Romanians approach the town quickly from the west and cross the river. Their cavalry draws up 3 hexes from the town. This is inside of the range of the Soviet machinegun platoons, but outside of the 2-hex range of the rifle platoons. The 3-hex range allows the Romanians to spot enemy units in the town and begin the process of trying to soften up the defense.

The ‘softening up’ involves bombardment fire from the Romanian off-board artillery – two concentrations of 12-strength fire – direct fire from their two 8-strength machinegun platoons (stacked to allow combined fire), and hail-Mary bombardment from their 5-strength 60mm mortar platoon.

The Russians respond with bombardment fire from their own mortar platoon, which is located in the woods south of town. There is an occasional head-game as the two sides trade activations and ‘passes’, but the Soviet machinegun platoons in the town generally don’t respond with direct fire. They elect instead to hold their fire and await a chance to use opportunity fire at a closer range.

Ill-timed direct fire from the Russian defenders could essentially give the Romanians a ‘free pass’ to an assault. As long as the defense remains in pretty good order (not a lot of disruption or demoralization results), the prospect of taking opportunity fire with a +3 column shift will generally persuade the Romanians that an assault is a bad idea.

Softening up a defense can take time, though. In this game, the morale boost of the Soviet captain keeps the defense steadfast until the 0800 turn, when the Romanian artillery finally has an effect on the units in hex 1004. The machinegun platoon in the hex takes a disruption result and the rifle platoon is demoralized, which at last gives the Romanians an opening to assault without having to absorb a huge amount of opportunity fire.

After their artillery strikes home, the Romanians use follow-on activations to execute a 2-hex ‘charge’ assault with some of their cavalry. Opportunity fire from 1003 inflicts a step loss on one cavalry platoon (which then disrupts) and causes the Romanian 9-morale locotenant to demoralize, but they have enough troops to commit that they can get a couple of platoons into assault.

As I mentioned in a previous post, in the PG system assault is usually a multi-turn process – and the attack on Fontana Alba isn’t going to be an exception. The demoralized Soviet rifle platoon fails to recover and flees to 1003 – but the Red captain feeds one of his reserve platoons into 1004 to bolster the machinegun platoon.

In the 0815 and 0830 turns, the Romanians work more troops into the assault, and also manage to send in an assault on 1003. The following photo shows the situation at the conclusion of the 0830 turn (which is where the situation will be left for today).


One of the things that’s almost impossible to escape in a tactical game is the use of various markers to keep track of what’s happening to the units on the map. PG is no different. MOVED and FIRED markers record which units have activated. DISRUPTED and DEMORALIZED markers show morale status. DUG IN markers indicate an additional status for the defenders. As you can see in the photo, stacks of units with markers can get pretty hefty by the end of a turn. One of the hazards of the hobby, I guess. A good pair of tweezers (or forceps) comes in pretty handy for us fumbly-fingered middle-agers who are trying to manipulate all of it on the gameboard.

Astute gamers will note one thing about my photos of the example game. I am using a mix of ‘old’ counters from the original PanzerGrenadier and ‘new’ counters from East Front Deluxe.

The Soviet infantry counters are ‘old’ counters, distinguishable by the individual numbering of units in the small type right under their unit type symbol. Except for that unit number, they are graphically the same as the ‘new’ counters. But the ‘new’ Soviet infantry in EFD is printed on the thinner counter stock that appeared first in Beyond Normandy (and has since been done away with), so I use the old counters because they’re more hefty.

The game markers are also the ‘old’ style with the plain white backgrounds and rather plain labelling. The new morale and activation markers are much more colorful – distractingly colorful, for my taste. I prefer the plain markers because they’re easier to pick out in one of those big stacks and they lend less graphic ‘clutter’ to the appearance of a game in progress.